Table of Contents
Vehicles list
“Vehicles list” it displays all the company's vehicles in the form of a list and allows you to make changes to them.
Each vehicle is uniquely identified by its registration number.
In the list of vehicles you can:
- search for a vehicle using the search bar
- sort the list by registration number, vehicle type or mileage
- add a new vehicle by selecting the option:
📌 The actions that can be taken at the user level by checking the icons are:
Add vehicle
Follow the next steps to add a vehicle:
Step 1.
› Click on the option 
⇒ the Add Vehicle window will open..
Step 2.
› Add the vehicle information in the opened window: Registration number, vehicle type & the Fueling Params: Tank capacity, Additional consumption /ton/100 km (in liters/ton) Minimum Fuel in Tank, Average consumption without cargo (liters/100 km) & Vehicle parameters: Limited weight, Emission class, Axels, No of tires, Vehicle height, Vehicle width, Vehicle lenght aand Trailer type.
Step 3.
› Confirm the data by selecting the button 
The successful addition of a new user is confirmed by the message: “The vehicle has been added successfully”.“.
Step 4.
› Add the vehicle documents by selecting the option 
⇒ You can save here documents like: RCA, ITP, Insurance, CMR, Technical inspection and other documents.
Add vehicle file
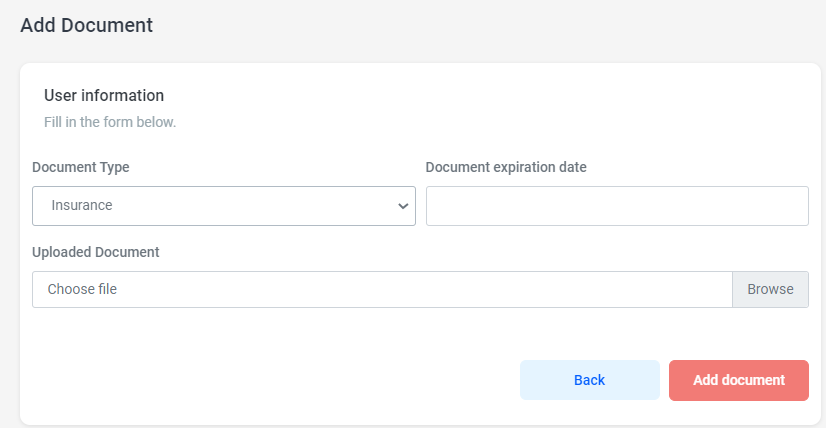
The dispatcher can add documents for each user in the application to help manage the fleet (ex: Insurance, License, Technical inspection)
› Click on the option Add document 
› In this window add document type, expiry date and then choose the file from your desktop.
› Confirm the addition of the document by selecting the button 
View vehicle files
 All documents saved by the dispatcher for each user. If one of the documents is expired, it will appear in the list in red and with the mentioned expiration date.
Documents can be deleted or downloaded.
Documents that have expired or are about to expire will be summarized and notified through a reminder in the Notifications section of the header.
Edit vehicle
Modify login data and user information: Name, Email, Password, Status, Phone by selection the option: Edit vehicle.


